Painter tape is a low-adhesive masking tape designed to protect surfaces and create clean, sharp paint lines. It adheres securely without damaging walls, trim, or glass and removes easily without leaving residue when taken off within the recommended time. Available in different adhesion strengths for delicate or rough surfaces, painter tape helps achieve professional-looking results and reduces paint bleed during painting projects.
Painter’s tape has revolutionized the painting industry since its invention in 1925 by Richard Drew at 3M. What began as a solution to protect two-toned automotive paint jobs has evolved into an essential tool for both professional contractors and DIY enthusiasts. This comprehensive guide explores everything you need to know about painter tape, from understanding the fundamental differences between various types to mastering professional application techniques that ensure flawless results every time.
Whether you’re tackling a simple accent wall or managing a complex multi-room renovation, selecting the right painter tape and applying it correctly can mean the difference between amateur-looking paint lines and professionally crisp edges. The global painter tape market, valued at over $5.5 billion in 2024, continues to innovate with advanced adhesive technologies, eco-friendly materials, and specialized formulations designed for virtually every surface and painting scenario imaginable.
What Is Painter Tape? Understanding the Essential Painting Tool
Painter tape is a specialized pressure-sensitive adhesive tape designed specifically for masking and protecting surfaces during painting projects. Unlike general-purpose masking tape, painter tape features a unique combination of crepe paper backing and low-tack adhesive that allows it to be removed cleanly without leaving residue or damaging underlying surfaces. The tape creates a barrier that prevents paint from bleeding onto protected areas while maintaining sharp, professional-looking paint lines.
The fundamental purpose of painter tape is threefold: it protects surfaces you don’t want painted, creates precise paint edges, and prevents paint bleed-through. The crepe paper backing provides flexibility that allows the tape to conform to slight surface irregularities while maintaining a tight seal. Modern painter tapes incorporate advanced adhesive technologies including pressure-sensitive acrylics and rubber-based compounds that bond effectively during application but release cleanly when removed within the manufacturer’s specified timeframe.
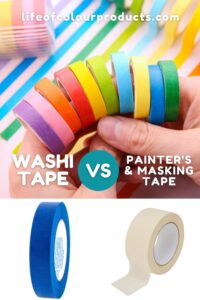
Painter Tape vs. Masking Tape: Key Differences
Masking Tape Delivers sharp, bleed-resistant lines and can be removed cleanly weeks later without damaging surfaces or leaving residue. Painter’s tape, in contrast, utilizes a specially formulated low-tack adhesive that creates sufficient bond strength to prevent paint seepage while remaining gentle enough to remove without surface damage. The adhesive strength of painter tape is calibrated to work within specific removal timeframes—typically ranging from 7 to 60 days depending on the formulation. Premium painter tapes also incorporate UV-resistant properties that prevent adhesive degradation when exposed to sunlight, a critical feature for exterior applications where masking tape would fail within hours.
Cost considerations often tempt users toward cheaper masking tape, but this represents false economy. While masking tape may cost 30-50% less per roll, the risk of paint damage, surface scarring, and time-consuming cleanup makes painter tape the economically superior choice for any painting project. Professional painters universally recommend investing in quality painter tape, as the few dollars saved by using masking tape pale in comparison to the potential cost of repairing damaged surfaces or redoing substandard work.
How Painter’s Tape Works: The Science Behind Clean Lines
The technology behind painter tape illuminates why proper application techniques matter so much. The tape’s crepe paper backing is manufactured through a specialized creping process that creates microscopic wrinkles in the paper, giving it remarkable flexibility and conformability. This textured surface allows the tape to stretch slightly and accommodate minor surface irregularities that would create gaps with smooth-backed tapes.
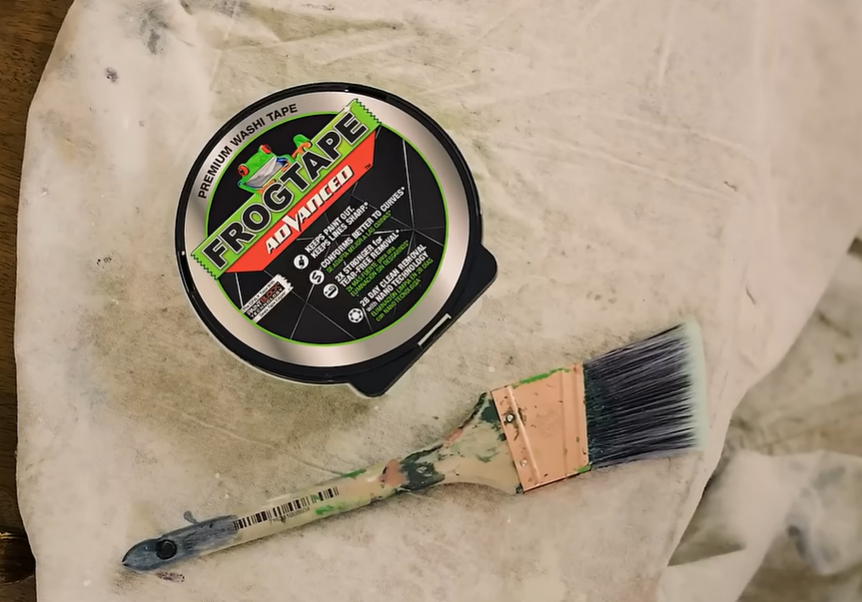
The pressure-sensitive adhesive layer represents the most critical component. When pressure is applied during installation, the adhesive flows microscopically into surface pores and textures, creating mechanical bonding. The adhesive formulation balances competing requirements: it must be tacky enough to seal against paint penetration yet gentle enough to release without removing paint or leaving residue. Modern premium tapes incorporate proprietary edge-sealing technologies—such as FrogTape’s PaintBlock system—that use superabsorbent polymers that react with water-based paint to create a micro-barrier precisely at the tape edge.
Types of Painter Tape: Finding the Right Product for Your Project
The painter tape market offers numerous formulations, each engineered for specific surface types and application conditions. Selecting the appropriate tape type is paramount to project success, as using the wrong tape can result in poor adhesion, paint bleed, or surface damage. Understanding the characteristics and ideal applications for each tape category enables informed decision-making that ensures optimal results.
Multi-Surface Painter’s Tape (Blue Tape)
The iconic blue painter tape represents the most versatile and widely used category. Multi-surface formulations feature medium-strength adhesive engineered to work effectively across smooth and lightly textured surfaces including painted walls, trim, baseboards, glass, and metal. The standard blue tape from manufacturers like 3M ScotchBlue offers a 14-day clean removal window, meaning it can remain in place for up to two weeks without leaving residue or causing damage when properly removed.
Blue tape’s popularity stems from its reliable performance across the broadest range of common painting scenarios. It provides sufficient adhesion to prevent paint seepage on most interior surfaces while remaining gentle enough to avoid damage on properly cured paint and finished surfaces. Professional painters keep multiple rolls of standard blue tape on hand as their go-to solution for approximately 70% of masking applications.
Delicate Surface Painter’s Tape (Purple/Yellow Tape)
Delicate surface tapes represent specialized formulations for sensitive applications where standard painter tape would risk damage. Distinguished by purple or yellow coloring, these tapes feature ultra-low-tack adhesives specifically engineered for freshly painted surfaces (as soon as 24 hours after painting), wallpaper, faux finishes, and primed drywall. The extended clean removal timeframe—up to 60 days for premium formulations—provides flexibility for complex projects requiring prolonged masking.
High-Adhesion Painter’s Tape (Green/Orange Tape)
Rough surface and exterior applications demand the aggressive adhesion characteristics of high-performance painter tapes, typically colored green or orange for easy identification. These formulations employ stronger adhesive systems capable of bonding to challenging surfaces including brick, stucco, concrete, textured exterior siding, and heavily textured interior walls. UV-resistant formulations maintain stable adhesion characteristics for 5-14 days of outdoor exposure.
Top Painter’s Tape Brands: Expert Reviews and Comparisons
ScotchBlue (3M) – Industry Leader
3M’s ScotchBlue brand represents the gold standard in painter tape, commanding approximately 40% of the professional market. The Original Multi-Surface formula has remained the number one professional recommendation for over 30 years. Premium pricing typically ranges from $6-8 per standard roll, reflecting investment in adhesive technology and quality control that ensures batch-to-batch consistency.
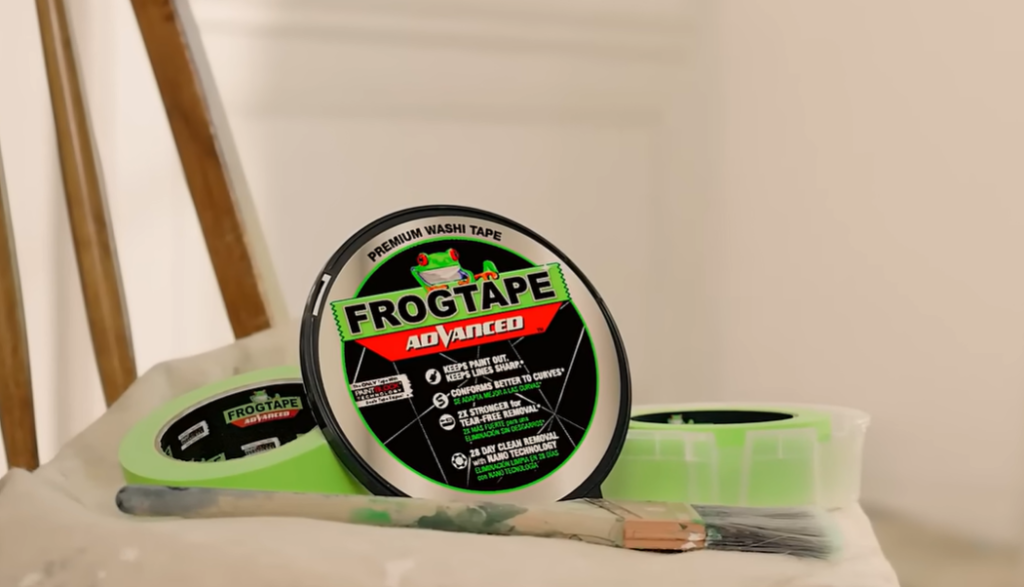
FrogTape – PaintBlock Innovation
FrogTape entered the market in 2007 with revolutionary PaintBlock Technology that fundamentally changed performance expectations. The proprietary system incorporates superabsorbent polymer that reacts with latex paint moisture to create a micro-seal along the tape edge, effectively eliminating paint bleed even on moderately textured surfaces. Independent testing consistently shows FrogTape producing sharper paint lines than any competitor.
Duck Brand – Best Value Option
Duck Brand’s Clean Release Painter Tape delivers respectable performance at approximately 50% less cost than premium brands, making it attractive for budget-conscious DIYers and contractors working on price-sensitive projects. The tape performs adequately for most basic applications while the performance gap compared to premium brands has narrowed considerably.
How to Apply Painter’s Tape Like a Professional
Proper painter tape application separates amateur results from professional-quality finish work. While the basic concept seems simple, the nuances of surface preparation, application technique, and edge sealing dramatically impact outcomes. Professional painters develop systematic approaches that ensure consistent results.
Surface Preparation: The Foundation of Success
Surface preparation represents the most overlooked yet critical factor. Dust, dirt, grease, and moisture all interfere with adhesive bonding. Professional tapers always begin by thoroughly cleaning surfaces with a lightly dampened microfiber cloth. Temperature conditions matter: painter tape adhesive activates between 50-100 degrees Fahrenheit. Below this range, adhesive becomes too stiff; above it, premature curing may occur.
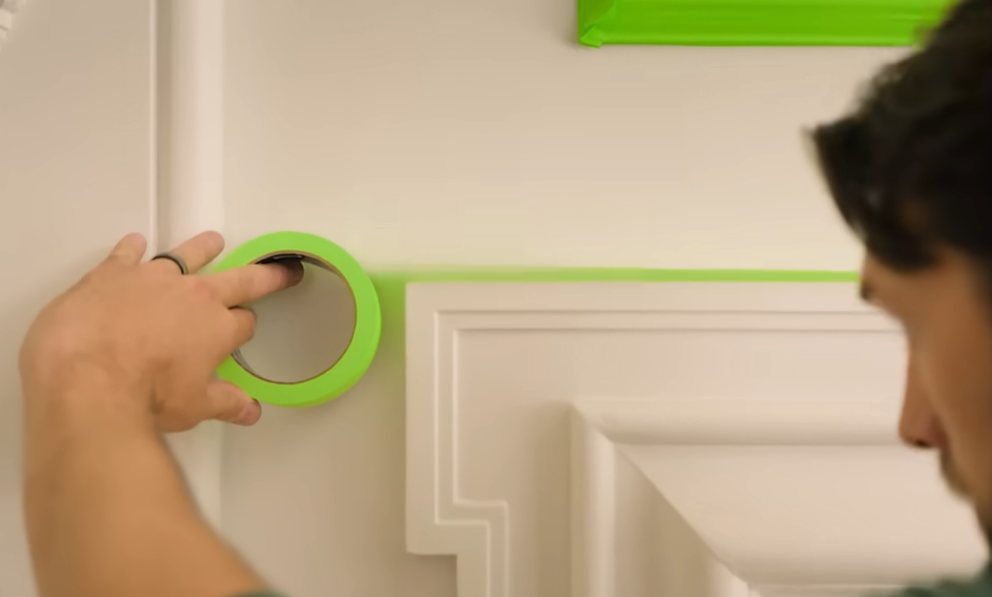
The 6-Inch Method for Straight Lines
Begin by sticking the first 2-3 inches of tape to your starting point. Rather than unrolling large sections, peel off only 6-8 inches at a time while maintaining slight tension. This prevents tape from twisting, wandering, or adhering improperly. Use the edge of trim or molding as a guide, continuing in controlled increments.
Sealing the Edge: Preventing Paint Bleed
Edge sealing determines paint line quality. After positioning tape, firmly press down the edge closest to where paint will be applied. Professional tapers use a plastic putty knife, old credit card, or specialized burnishing tool to apply concentrated pressure along the paint edge. Make 2-3 passes with increasing pressure each time to eliminate microscopic gaps where paint could wick under the tape.
Painting Techniques with Tape: Achieving Flawless Results
Timing: When to Remove Painter Tape
The 25-30 Minute Rule
For latex paints in typical indoor conditions, the optimal removal window opens approximately 25-30 minutes after paint application. At this point, paint surface feels dry to light touch but remains slightly tacky and flexible beneath. This state allows the paint film to separate cleanly along the tape edge rather than tearing or peeling. Exact timing varies with temperature, humidity, paint thickness, and formulation.
Removal Angle and Speed
Always pull tape at a 45-degree angle back over itself rather than perpendicular to the surface. This minimizes shear force that could pull up paint or damage surfaces. Maintain steady, moderate speed. If you encounter unusual resistance, stop immediately and use a sharp utility knife to score along the tape edge where it meets the painted surface.
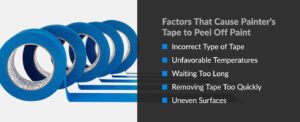
Common Painter Tape Problems and Solutions
Tape Won’t Stick to Surface
Adhesion failure stems from surface contamination, environmental conditions, tape storage issues, or incompatibility between tape type and surface. Remediation begins with thorough surface cleaning. Ensure surfaces dry completely. If ambient temperature falls below 50 degrees Fahrenheit, warm the tape and allow surfaces to reach minimum recommended temperature. High humidity above 85% may necessitate dehumidification.
Paint Bleeding Under Tape
Paint bleed occurs when paint penetrates microscopic gaps between tape and surface through capillary action. Prevention strategies: minimize surface texture through light sanding, use putty knife for aggressive edge sealing, employ premium tapes with edge-sealing technology. Professional painters use base-coating technique: paint along tape edge using the same color as the protected surface to seal any gaps, allow to dry, then apply finish coat in new color.
Tape Leaving Residue or Pulling Paint
These problems indicate leaving tape in place too long, using inappropriate tape for the surface, or removing tape from insufficiently cured paint. Manufacturer clean removal timeframes represent tested limits beyond which adhesive chemistry begins changing. Heat accelerates adhesive curing, potentially reducing safe removal window. Paint pulling typically occurs when tape is applied to paint that hasn’t fully cured: latex paint requires minimum 24 hours before delicate surface tape application, 7 days for standard tape, and oil-based paint needs 30-60 days full cure.
Painter’s Tape for Different Surfaces
Interior Walls
Smooth drywall represents the ideal surface for painter tape. Standard medium-adhesion blue tape performs optimally. Key variable is paint age: freshly painted walls less than 24 hours old cannot safely accept even delicate surface tape. Between 24 hours and one week, use purple or yellow delicate surface tape. After seven days cure time, standard blue tape works well. Heavily textured walls including orange peel or knockdown finishes require green rough-surface tape.
Trim, Baseboards, and Molding
Wood trim finished with paint or varnish generally accepts standard blue tape well. Freshly painted or stained trim requires minimum 24-48 hour cure before tape application. Crown molding presents particular challenges: rather than taping into the acute ceiling-wall corner, professional painters offset tape approximately one-eighth inch from the corner on the surface opposite the one being painted.
Exterior Applications
Outdoor painting introduces environmental factors that dramatically affect tape performance. UV radiation degrades standard tape adhesive within hours. Always specify UV-resistant exterior tape for outdoor work. Temperature extremes: tape won’t adhere properly below 50 degrees Fahrenheit, and above 100 degrees adhesive can become too aggressive. Rough surfaces including brick, stucco, and concrete absolutely require green or orange rough-surface tape.
Professional Tips and Trade Secrets
Professional painters develop extensive knowledge through thousands of hours of practical application. Temperature management extends beyond ensuring tape adheres: working within the optimal 60-80 degree Fahrenheit range affects every aspect of performance. Advance application timing provides another professional edge: applying tape at least 30 minutes before painting allows adhesive to develop initial bond with the surface.
Money-Saving Strategies
Bulk purchasing reduces per-roll costs by 30-50% for large projects. Case quantities of 24 rolls from wholesale distributors provide significant savings. Width optimization prevents waste: using one-and-a-half-inch tape where three-quarter-inch suffices wastes material. Selective taping represents ultimate efficiency: skilled cutting-in technique eliminates need for taping many edges, dramatically reducing both material cost and application time.
When NOT to Use Painter Tape
Experienced professional painters paradoxically use less tape because they recognize situations where tape creates more problems than it solves. Extremely rough or heavily textured surfaces often defeat tape’s sealing capability. Oil-based paints with extended drying times present another tape-inappropriate scenario. Ultra-sharp edge requirements sometimes exceed even the best painter tape capabilities, demanding liquid maskant products instead.
Alternative Uses for Painter Tape Beyond Painting
The unique properties that make painter tape ideal for painting also make it surprisingly useful for numerous non-painting applications. The tape’s availability, affordability, and damage-free removal characteristics have inspired creative problem-solving across diverse contexts.
Household Applications
Labeling containers, storage boxes, and tools represents the most common alternative use. The tape accepts permanent marker writing clearly while removing without residue. Emergency wardrobe repairs benefit from tape’s gentle adhesion: fallen hems can be temporarily secured. The moderate tack makes it useful for picking up broken glass shards and fragments too small for safe hand collection.
Workshop and DIY Projects
Woodworkers apply painter tape to cut lines on plywood and veneer to prevent tear-out during sawing. The tape reinforces thin surface layers, holding wood fibers in place as the saw blade exits. Bundling and organizing workshop cables, hoses, and extension cords becomes easier with painter tape that won’t leave residue. Surface protection during construction or renovation: tape can secure drop cloths, mask cabinet hardware, or protect adjacent surfaces.
Frequently Asked Questions About Painter Tape
How long can painter tape stay on surfaces?
Standard blue multi-surface tape is engineered for clean removal up to 14 days on most interior surfaces when kept at moderate temperatures. Delicate surface formulations extend this timeframe to 30-60 days. Exterior UV-resistant tapes should generally be removed within 3-7 days. These timeframes assume ideal conditions. High temperatures accelerate adhesive curing, potentially reducing safe removal time by 30-50 percent.
Can I reuse painter tape?
Painter’s tape is explicitly designed as a single-use product. The pressure-sensitive adhesive activates during initial application, with adhesive material transferring to the bonded surface. Once removed, the tape retains only a fraction of its original adhesive strength and will not seal edges reliably. Professional painters universally treat tape as consumable material.
What’s the difference between blue and green painter tape?
Blue tape utilizes medium-strength adhesive for smooth to lightly textured surfaces with 14-day clean removal. Green tape employs significantly stronger adhesive formulated for rough, textured, and outdoor surfaces. Green tape incorporates UV-resistant adhesive chemistry that maintains stable performance under direct sunlight for 5-14 days. The stronger adhesion may pull paint from improperly cured surfaces and requires more careful removal technique.
Will painter tape damage fresh paint?
Painter’s tape applied to insufficiently cured paint presents substantial damage risk. Water-based latex paints require minimum 24 hours cure before accepting delicate surface tape, 7 days for standard blue tape. Oil-based paints cure far more slowly, requiring 30-60 days minimum before any tape application is safe. Environmental conditions dramatically influence cure rates: high humidity slows latex paint curing, low temperatures similarly extend cure periods.
Can painter tape be used outdoors?
Painter’s tape can function outdoors, but only specific UV-resistant formulations perform reliably. Standard blue tape contains adhesive that degrades rapidly under ultraviolet radiation. Any exterior painting requires tape specifically labeled as UV-resistant, exterior-rated, or outdoor formulation. Maximum recommended duration is typically 5-7 days. Temperature extremes present additional challenges: tape won’t adhere properly below 50 degrees Fahrenheit, and above 100 degrees adhesive may become excessively aggressive.
Expert Product Recommendations and Buying Guide
Best Overall: ScotchBlue Original Multi-Surface
3M’s ScotchBlue Original Multi-Surface tape represents the industry benchmark. Three decades of continuous refinement have produced a product that performs consistently across the widest range of applications. The tape handles approximately 70 percent of all taping situations competently. Pricing at $5-7 per standard 60-yard roll positions it as moderately premium. For DIYers tackling first painting projects or professionals seeking reliable general-purpose tape, ScotchBlue Original represents the safest choice.
Best Value: Duck Brand Clean Release
Duck Brand Clean Release delivers acceptable performance at approximately half the cost of premium brands. Testing shows Duck Brand performs nearly comparably on ideal surfaces with differences becoming apparent only on challenging applications. For experienced painter whose technique compensates for minor tape limitations, or for applications where slight edge imperfection is acceptable, these compromises represent reasonable trade-offs for 50 percent cost savings.
Best for Crisp Lines: FrogTape Multi-Surface
FrogTape’s patented PaintBlock Technology virtually eliminates paint bleed. The superabsorbent polymer reacts with water-based paint moisture to create a micro-seal. Blind testing consistently shows FrogTape producing sharper, cleaner paint lines than any competitor. Premium pricing—typically 20-30 percent more than ScotchBlue—positions FrogTape as a specialty product for high-visibility applications where paint line quality directly impacts perceived work value.
Conclusion: Mastering Painter Tape for Professional Results
Success with painter tape emerges from understanding the technology, selecting appropriate products for specific applications, mastering application techniques, and recognizing the critical importance of timing. Surface preparation establishes the foundation for adhesion. Proper tape selection matches adhesive characteristics to surface requirements. Careful application and thorough edge sealing prevent paint bleed. Optimal removal timing preserves paint integrity while ensuring clean tape release.
Professional painter distinguish themselves through disciplined execution of fundamentals and systematic approaches that eliminate variability. They clean surfaces thoroughly, apply tape in manageable sections, seal edges aggressively with burnishing tools, and remove tape within optimal timing windows. These habits, developed through thousands of applications, represent accessible knowledge that any motivated person can adopt.
The investment in quality painter tape and the time devoted to proper technique pays dividends that extend beyond individual project success. Clean, sharp paint lines elevate the entire aesthetic of a space. Whether undertaking a single accent wall or managing extensive renovation projects, the principles outlined in this guide provide the foundation for consistently excellent results. Success requires no special talent—only the commitment to understanding product capabilities, preparing surfaces properly, applying tape carefully, and respecting manufacturer guidelines for removal timing.